Our log home situated on 40 acres in Montana and the move from the East coast was a childhood dream come true, and a labour of love. It quickly became apparent that there is much more variety than one would ever think. Not only do log homes come in all shapes and sizes, but the logs themselves come in as many variations as you can imagine.
There are two categories of log homes: handcrafted and milled log homes. Initially, you may not realize what you are looking at, but there are some basic guidelines that will clarify the differences. A handcrafted log home is just that; the logs are peeled by hand, notched by hand, and in many cases, each log is scribed to fit exactly on top of another log. In many handcrafted homes, the logs are stacked alternately, so the large end of a log is stacked on top of the tapered end of the log beneath. A milled log home will feature logs that are uniform in shape, and the logs will be cut to fit together, such as with a tongue-and-groove or Swedish cope, so that they stack easily and evenly. This is what we chose and alas, The Fish Creek House was born. There is a big price difference between a handcrafted and a milled log home. This is mostly because of the intense labor required to construct a handcrafted home, and because of the larger diameter logs that are normally used. The vast majority of homes built today are milled log homes.
If you see a log home with round logs and chinking, that is a first indication that this is could be a handcrafted log home. Chinking was historically a mortar-like material that filled the gaps between the logs. Modern science has created an acrylic compound that expands and contracts with the wood; it is applied as a wide white stripe. If a handcrafted log is not scribed, then chinking is a must because the logs leave gaps along their length. We've chinked interior and exterior... vastly extending the life as well as the beauty of the logs.
On milled logs, there are many joinery systems to choose from. Today, the most popular joinery is called a "Swedish cope". This is where each log is scooped out to fit snugly on the curve of the log beneath. It gives a very smooth and natural look. This is what we choose. Another joinery system is the tongue-and-groove, or double tongue-and-groove depending on the manufacturer. The tongues are cut into the top of the log and corresponding grooves at the bottom. These create a tight fit and stack easily. A more traditional, early American notch is called the dove-tail, which is a mortise and tenon notch usually cut into squared timbers. There are many other corner systems available, but these are the most commonly used
The characteristic corner of your log home will speak volumes to the person who knows how to read it.
A milled log that is saddle-notched will stack the same way (of course, every log will look exactly the same). Because saddle-notched logs are staggered, course to course, the log ends will be visible on the interior corners of the house as well as the exterior. This gives a very rustic look. A butt-and-pass corner gives you an end where there is a space between every other log. This is because one log butts up against the intersecting log, which runs past it. These logs are all laid on the same course, so that with the interior corners of your home, the logs will come to a squared edge.
The shape, or profile of the log is another feature which helped us decide what kind of package to purchase. Many people prefer a "D" log, which is round on the outside and flat on the inside. This gives you a horizontal wood-paneling look, and is easy to hang pictures on. Others prefer a round log, which is a little more rustic and presents many challenges - such as how to join the logs to the sheetrock. Squared timbers, which give a more Appalachian look to the home, tend to be tall and fairly narrow, and are often grooved for the application of chinking.
The average milled log home will use pine logs in 6" and 8" diameters. You can also find them in 10" and 12" diameters. Anything larger than 15" will probably roll you over to a handcrafted home. Cedar logs are an upgrade, and can be found in 6", 8" and occasionally 10" diameters. Some manufacturers more rarely use oak, cypress, fir, hemlock, larch, poplar, spruce, and walnut. These rarer woods will be a price upgrade. Because of the superior log care products on the market today that protect all the logs effectively, the wood species largely becomes a matter of personal taste. The best rule of thumb when choosing log species is to stay with a wood that is native to your area. The logs will adapt to the environment more comfortably.
In contrast to other building materials, wood "breathes." This means that it is open for diffusion in both directions, because billions of tiny cells ensure there is an on-going renewal of the air molecules in the inner room. At the same time, the surface temperature of wooden elements in the inner rooms of the building is always similar to the corresponding room air temperature and, therefore, always pleasant for the people living there. The log walls regulate humidity by absorbing moisture and discharging it again when the outer conditions change. The electrostatic properties of wood mean that it does not get charged up with static electricity causing minimal dust to be whirled around in the rooms
Newcomers are continually amazed to discover that the logs are their own insulation. To compare a stick-frame wall to a log wall by using the "R-value" is not comparing "apples to apples". Logs have a lower "R-value" than insulated 2x4 walls. However, they work on the principal of thermal mass. Because of the cellular structure of logs, they tend to absorb the heat and hold it longer than traditional walls. The logs will actually absorb the heat from the interior of the house (or from the sun, if facing south), and when the temperature drops at night, the walls will generate that heat back into the house until the temperatures equalize. They take longer to warm up, and stay warm much longer. Conversely, they stay cooler in the summertime. Here in Montana, we turn the air conditioner on by opening another window!
Some producers feature a half-log system, where the logs are attached outside-and-inside to 2x4 or 2x6 stick-frame walls. This adds the extra R-value of an insulated wall, along with the beauty of the log, and also makes it easier to install electrical wiring. Ultimately, these systems are a bit more expensive than full-log, because of the additional cost of the lumber. But they do give the added ability to vary the interior of your house, so that some interior walls could be sheetrock, stone, or tongue-and-groove. In any case, many modern manufacturers use the half-log system on their second floor, to compensate for the huge windows, which may displace so many logs that the wall's integrity could be compromised. Also, because the large windows settle at a different rate than logs, the stick-framed second floor equalizes the overall settling. With the best manufacturers, you won't be able to tell on the outside where the full logs end and the half logs begin.
It would save a lot of work for the buyer to get a "turnkey" price on the logs, the lumber, the windows and doors, and the roof - what is commonly known as a "weathered-in shell". However, this complete system only makes sense if you are local to the manufacturer; otherwise, you'll be spending thousands of dollars to ship ordinary lumber across the country. After all, there is no difference between a roof used on an ordinary house and a roof used on a log home. You choose the kind of roof you want, but it'll come from the same manufacturer. The same goes for the floors, the doors, the kitchen, and the heating system. Windows can be a little tricky; you'll have to find a manufacturer that is willing to make a extended window-sill (or jamb) to accommodate the thickness of the logs. Most major window companies are able to do this.
Remember that log homes are completely custom. No log home company will offer you a choice of kitchens or bathrooms like a development builder. You will have to shop for these yourself, and the possibilities are limitless. Your builder may make some decisions for you, but you will be better served to pick your own flooring, light fixtures, faucets and even door knobs. Most manufacturers do not want to have anything to do with the foundation; that is not their business. You can use any kind of foundation you want, but you'll need to contact a local contractor to do that job, or have your builder do so.
Log homes are not maintenance-free - nor are they overwhelmingly laborious. Although the products on today's market do a fantastic job of protecting the logs from sun, rain and insects, they do need to be re-applied ever three to five years depending on the wall exposure. This "maintenance coat" is much easier to apply than the original coats of stain, and no, you don't have to strip off the old coat first. So it's not as bad as it sounds! However, you must inspect the logs at least once a year for excessive cracking (or checking) - especially when the check opens upward, creating a water trap.
Log homes bring all of the beauty of the outdoors into your home.. ahh the makings of Montana memories...
Se afișează postările cu eticheta traduceri. Afișați toate postările
Se afișează postările cu eticheta traduceri. Afișați toate postările
marți, 1 februarie 2011
A Schoolin' in Scones
Ah, there's nothing like a tender, steaming scone in the morning. (Pronounced "skawn" like "fawn" or "scone" like "tone" -Webster says either is okay.) They're quick, they're easy, and with a few tips, they are absolutely delectable. Ever since my first trip to England, the quest for the perfect scone continues Here at the B&B, they are great "appetizer course" while guests are waiting for us to whip up the breakfast menu du jour or of course mid afternoon hungries
Scones are probably the easiest and quickest of breads. Once you get the ingredients assembled, most recipes only require fifteen minutes of prep time and another fifteen minutes or so of baking time. A mix is even quicker.
But there are some keys to making those flakey, tender scones that you've been dreaming about.
Key #1: Use the right flour. Use a soft, low protein flour-we use a quality pastry flour. You want soft, tender scones and too much protein leads to too much gluten which makes your scones chewy.
Key #2: Keep your ingredients cold. Temperature is critical to buttery, flakey scones. Start with very cold butter-it should chip when you cut it into chunks and your liquids should be ice cold. Before you start, measure your milk or water and put it in the freezer for ten minutes. Consider chilling your mixing bowl before mixing.
Why do your ingredients need to be cold? The objective is to keep the butter a solid and not let it melt into a liquid. If your dough is kept cold, it will have little bits of dispersed butter. In the heat of the oven, that butter melts into the dough but leaves pockets and layers in the scones.
Work with the dough quickly to keep it cool.
Key #3: Don't work your dough too much. Kneading converts the protein to gluten. Mix only until the ingredients come together into a combined mass.
Key #4: Use a folding technique. For flakey, layered scones, use a folding technique. Roll the dough out to about 3/8-inch thick. Fold the dough in half and in half again and again. Roll the dough out to about 3/4-inch thick before cutting the scones.
Key #5: Use a ruler. If you would like nice, neat scones, use a ruler both as a straightedge to cut against and to measure equally-sized scones.
Key #6: Leave the cut edges of the scones alone. Patting the edges with your fingers melds the edges so that the scone will not rise as nicely or have a flakey, layered structure.
Key #7: Don't over-bake your scones. Over-baking for even a minute or two will dry your scones out. As soon as the edges begin to turn brown, remove them from the oven. Immediately, place the scones on a wire rack-the hot pan will continue to dry the scones.
More Tips
* Scones can be frozen for up to three months. Reheat them at 300 degrees for 10 to 15 minutes. Probe the inside of the scone to make sure that it is warm.
* Scones are best fresh out of the oven. Recipes with more butter keep fresh longer.
* For the best shape, don't roll your dough thinner than 1/2-inch.
* Scones will rise to double their unbaked height in the oven. If they are properly cut, they will spread very little so you can place them close together on the baking sheet.
MONTANA MORNIN' SCONES
Makes 6-8 large triangular scones Montana Mornin' scones
3 cups AP flour
1/3 cup sugar
2½ tsps. baking powder
½ tsp baking soda
¾ tsp salt
6 ozs. cold butter, cut into small pieces
½ cup Nestle Coco Evap milk + ½ cup whole milk mixed with 1 T vinegar or
1 cup buttermilk
Preheat oven to 425°F. Line a baking sheet with parchment paper.
In a medium bowl, stir together the flour, sugar, baking powder, baking soda, and salt. Add the cold butter pieces and using your fingers (preferred method), a pastry blender, or two knives, work the butter into the flour until the mixture resembles coarse cornmeal. Don’t worry about large pieces of butter remaining – they’ll add to the scones’ flakiness.
Slowly pour in 1 cup buttermilk – careful, you might not need all the liquid. The resulting dough will be soft and just barely hold together. Transfer the dough onto a floured surface, a Silpat mat, or onto the prepared baking sheet. Knead the dough gently until it holds together – a dozen turns should do. Use a soft hand or else the scones will be tough.
Using a rolling pin or your hands, roll out/flatten the dough into a circle of the desired thickness. With a bench scraper or long knife, cut the circle into 6-8 triangles. At this point, you can brush the scones with some melted butter and/or drizzle them with some sugar.
Bake the scones for 12-17 minutes – baking time will depend on how big and thick your scones are. The scones are done when they’re lightly golden on top and are firm when pressed. Let cool briefly and serve warm.
Cinnamon Bun Scones
I happened upon this recipe as I was looking for something quick and easy for Sunday breakfast guests. They were wanting cinnamon rolls, but, alas, I couldn’t turn back time and prepare them Saturday night. Being a cinnamon freak myself, do yourself a favor. Make these as soon as is humanly possible. Seriously, they are that good. The oats and cinnamon and vanilla and pecans all just come together into one of the best things I’ve had for breakfast in a long time and the guests nabbed the leftovers .. as well as a copy of the recipe.

2 cups all-purpose flour
1 cup Quaker® Oats, quick or old fashioned, uncooked
1/4 cup + 2 tablespoons granulated sugar
1 tablespoon baking powder
1/4 teaspoon salt
8 tablespoons (1 stick) butter or margarine, chilled and cut into pieces
3/4 cup milk
1 egg, lightly beaten
1 teaspoon vanilla
1/2 cup toasted chopped pecans
2 teaspoons ground cinnamon glaze
3/4 cup powdered sugar
3 teaspoons orange juice or milk
Preparation Steps
Heat oven to 425°F. Spray cookie sheet with cooking spray.
In large bowl, combine flour, oats, 1/4 cup granulated sugar, baking powder and salt; mix well. Cut in butter with pastry blender or two knives until mixture resembles coarse crumbs. In small bowl, combine milk, egg and vanilla; blend well. Add to dry ingredients all at once; stir with fork or rubber spatula until dry ingredients are moistened. In small bowl, combine remaining 2 tablespoons granulated sugar with the pecans and cinnamon; mix well. Sprinkle evenly over dough in bowl; gently stir batter to swirl in cinnamon mixture (Do not blend completely.) Drop dough by 1/4 cupfuls 2 inches apart on cookie sheet.
Bake 11 to 13 minutes or until golden brown. Remove to wire rack; cool 5 minutes. In small bowl, combine powdered sugar and enough orange juice for desired consistency; mix until smooth. Drizzle over top of warm scones. Serve warm.
Scones are probably the easiest and quickest of breads. Once you get the ingredients assembled, most recipes only require fifteen minutes of prep time and another fifteen minutes or so of baking time. A mix is even quicker.
But there are some keys to making those flakey, tender scones that you've been dreaming about.
Key #1: Use the right flour. Use a soft, low protein flour-we use a quality pastry flour. You want soft, tender scones and too much protein leads to too much gluten which makes your scones chewy.
Key #2: Keep your ingredients cold. Temperature is critical to buttery, flakey scones. Start with very cold butter-it should chip when you cut it into chunks and your liquids should be ice cold. Before you start, measure your milk or water and put it in the freezer for ten minutes. Consider chilling your mixing bowl before mixing.
Why do your ingredients need to be cold? The objective is to keep the butter a solid and not let it melt into a liquid. If your dough is kept cold, it will have little bits of dispersed butter. In the heat of the oven, that butter melts into the dough but leaves pockets and layers in the scones.
Work with the dough quickly to keep it cool.
Key #3: Don't work your dough too much. Kneading converts the protein to gluten. Mix only until the ingredients come together into a combined mass.
Key #4: Use a folding technique. For flakey, layered scones, use a folding technique. Roll the dough out to about 3/8-inch thick. Fold the dough in half and in half again and again. Roll the dough out to about 3/4-inch thick before cutting the scones.
Key #5: Use a ruler. If you would like nice, neat scones, use a ruler both as a straightedge to cut against and to measure equally-sized scones.
Key #6: Leave the cut edges of the scones alone. Patting the edges with your fingers melds the edges so that the scone will not rise as nicely or have a flakey, layered structure.
Key #7: Don't over-bake your scones. Over-baking for even a minute or two will dry your scones out. As soon as the edges begin to turn brown, remove them from the oven. Immediately, place the scones on a wire rack-the hot pan will continue to dry the scones.
More Tips
* Scones can be frozen for up to three months. Reheat them at 300 degrees for 10 to 15 minutes. Probe the inside of the scone to make sure that it is warm.
* Scones are best fresh out of the oven. Recipes with more butter keep fresh longer.
* For the best shape, don't roll your dough thinner than 1/2-inch.
* Scones will rise to double their unbaked height in the oven. If they are properly cut, they will spread very little so you can place them close together on the baking sheet.
MONTANA MORNIN' SCONES

Makes 6-8 large triangular scones Montana Mornin' scones
3 cups AP flour
1/3 cup sugar
2½ tsps. baking powder
½ tsp baking soda
¾ tsp salt
6 ozs. cold butter, cut into small pieces
½ cup Nestle Coco Evap milk + ½ cup whole milk mixed with 1 T vinegar or
1 cup buttermilk
Preheat oven to 425°F. Line a baking sheet with parchment paper.
In a medium bowl, stir together the flour, sugar, baking powder, baking soda, and salt. Add the cold butter pieces and using your fingers (preferred method), a pastry blender, or two knives, work the butter into the flour until the mixture resembles coarse cornmeal. Don’t worry about large pieces of butter remaining – they’ll add to the scones’ flakiness.
Slowly pour in 1 cup buttermilk – careful, you might not need all the liquid. The resulting dough will be soft and just barely hold together. Transfer the dough onto a floured surface, a Silpat mat, or onto the prepared baking sheet. Knead the dough gently until it holds together – a dozen turns should do. Use a soft hand or else the scones will be tough.
Using a rolling pin or your hands, roll out/flatten the dough into a circle of the desired thickness. With a bench scraper or long knife, cut the circle into 6-8 triangles. At this point, you can brush the scones with some melted butter and/or drizzle them with some sugar.
Bake the scones for 12-17 minutes – baking time will depend on how big and thick your scones are. The scones are done when they’re lightly golden on top and are firm when pressed. Let cool briefly and serve warm.
Cinnamon Bun Scones
I happened upon this recipe as I was looking for something quick and easy for Sunday breakfast guests. They were wanting cinnamon rolls, but, alas, I couldn’t turn back time and prepare them Saturday night. Being a cinnamon freak myself, do yourself a favor. Make these as soon as is humanly possible. Seriously, they are that good. The oats and cinnamon and vanilla and pecans all just come together into one of the best things I’ve had for breakfast in a long time and the guests nabbed the leftovers .. as well as a copy of the recipe.

2 cups all-purpose flour
1 cup Quaker® Oats, quick or old fashioned, uncooked
1/4 cup + 2 tablespoons granulated sugar
1 tablespoon baking powder
1/4 teaspoon salt
8 tablespoons (1 stick) butter or margarine, chilled and cut into pieces
3/4 cup milk
1 egg, lightly beaten
1 teaspoon vanilla
1/2 cup toasted chopped pecans
2 teaspoons ground cinnamon glaze
3/4 cup powdered sugar
3 teaspoons orange juice or milk
Preparation Steps
Heat oven to 425°F. Spray cookie sheet with cooking spray.
In large bowl, combine flour, oats, 1/4 cup granulated sugar, baking powder and salt; mix well. Cut in butter with pastry blender or two knives until mixture resembles coarse crumbs. In small bowl, combine milk, egg and vanilla; blend well. Add to dry ingredients all at once; stir with fork or rubber spatula until dry ingredients are moistened. In small bowl, combine remaining 2 tablespoons granulated sugar with the pecans and cinnamon; mix well. Sprinkle evenly over dough in bowl; gently stir batter to swirl in cinnamon mixture (Do not blend completely.) Drop dough by 1/4 cupfuls 2 inches apart on cookie sheet.
Bake 11 to 13 minutes or until golden brown. Remove to wire rack; cool 5 minutes. In small bowl, combine powdered sugar and enough orange juice for desired consistency; mix until smooth. Drizzle over top of warm scones. Serve warm.

Virginia City - Get Out of Jail
Montana is a vast and varied state of mountains, canyons, river valleys, forests and caverns. It's the 4th largest state in the nation but with our popularion under 1 million, it's actually the sixth least-populated state. Ah... there is room to breathe and nowhere is the air fresher. Oh sure, there's history, good food, and a variety of places to stay, but the main attraction is the sheer beauty. It's a land where everything seems intensified, in super sharp focus, richer in color, more majestic, more peaceful, and somehow closer to the sky. One of the many reasons we located here
Happily for travelers who prefer to avoid crowds, there's plenty of elbow room. Montana may be the fourth largest state in area (145,550 square miles), but, at under a million people, it ranks 48th in population density.
Virginia City
We played hookey mid week since the past weekend was a house ful of guests to visit this much touted city n .Also, since the builder of the log home we call the Fish Creek House Bed and Breakfast, is based out of Virginia City, we decided to give this tour a go... especially so we could see it up close and in person . Great recommendation for guests
Virginia City was the birthplace of Montana and the cradle of much history for the state. Though it may be best known as the rough-and-ready mining camp where vigilantes organized to rid the country of road agents and murderers, it is important to our history for many other reasons as well.
Gold is the force which created Virginia City, Montana and which controlled its history and made it strategic during the Civil War. Virginia City was producing enough gold to win the Civil War for whoever could capture it.
We noticed on our map that the Continental Divide runs pretty well north and south between Helena and Butte. The Continental Divide is like the ridge on your roof, where the water flows down and away from the ridge to the two sides of your house. The Continental Divide separates the water shed of the east from the west so that if you pour a glass of water on the east side it runs into the Atlantic Ocean and if you pour the water on the west side it runs to the Pacific Ocean. The Continental Divide is west of Helena and goes south to east of Butte, but at Butte it does a west and then north hook, then over to Anaconda, then south like a well behaved Continental Divide should until it becomes the Idaho - Montana border. Then it stays on the border and goes northeast, then across the lower end of Yellowstone National Park. When Idaho and Montana became separate territories the dividing line (the present state border) was believed to be the Continental Divide. Your map will show you where the crazy Continental Divide really runs. North of Virginia City the Continental Divide runs east and west, then circles around and finally, south of Virginia City, it runs east and west again. Then you will go over the top and down into Virginia City, Montana, and are you in for a treat!
The very much alive ghost town, Virginia City, Montana, is frozen in time. It is a remarkably well preserved old west Victorian gold mining town just 20 miles west of Yellowstone National Park (90 miles by road). When the gold ran out, there was still enough left so that homes and businesses were occupied, but there was not enough wealth to remodel the buildings. So it froze, and now represents the whole Victorian era. It is a true and original Old West. It is a gem, held within an incredibly rich area of natural beauty, recreation and history. Adjacent to Virginia City is Nevada City, filled with buildings and artifacts that will impress you. For many years Virginia City, Montana was a Rebel town in Union territory.
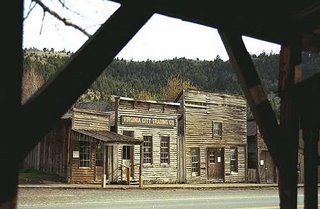 Back in 1865, merchants established the first businesses in Virginia City in wagons, tents, and wickiups (brush shacks) during the summer of 1863. Gold dust was the preferred medium of exchange, which was valued at $16 - $18/ounce.
 Of course what would a stop in Virginia City be without a stop at the brewery? And yes right next door is the opera house!!
In Old Town, we stopped off at Cousins Candy Shop The Virginia City shop has the original oak shelving and tin ceiling. Jars of the freshest candy are located in an old, covered chuck wagon pictured above. When we opened our shop in Old Town, we replicated the shelving and covered wagon exactly. Not only do we have great candy and a wonderful selection, Cousin's is just a fun place to visit with the entire family Of course the day wouldnt be complete without a stop at the Bale of Hay Saloon , an authentic wild west Saloon complete w/ Montana's best microbrews. Live music to to top off a great day
Happily for travelers who prefer to avoid crowds, there's plenty of elbow room. Montana may be the fourth largest state in area (145,550 square miles), but, at under a million people, it ranks 48th in population density.
Virginia City
We played hookey mid week since the past weekend was a house ful of guests to visit this much touted city n .Also, since the builder of the log home we call the Fish Creek House Bed and Breakfast, is based out of Virginia City, we decided to give this tour a go... especially so we could see it up close and in person . Great recommendation for guests
Virginia City was the birthplace of Montana and the cradle of much history for the state. Though it may be best known as the rough-and-ready mining camp where vigilantes organized to rid the country of road agents and murderers, it is important to our history for many other reasons as well.
Gold is the force which created Virginia City, Montana and which controlled its history and made it strategic during the Civil War. Virginia City was producing enough gold to win the Civil War for whoever could capture it.
We noticed on our map that the Continental Divide runs pretty well north and south between Helena and Butte. The Continental Divide is like the ridge on your roof, where the water flows down and away from the ridge to the two sides of your house. The Continental Divide separates the water shed of the east from the west so that if you pour a glass of water on the east side it runs into the Atlantic Ocean and if you pour the water on the west side it runs to the Pacific Ocean. The Continental Divide is west of Helena and goes south to east of Butte, but at Butte it does a west and then north hook, then over to Anaconda, then south like a well behaved Continental Divide should until it becomes the Idaho - Montana border. Then it stays on the border and goes northeast, then across the lower end of Yellowstone National Park. When Idaho and Montana became separate territories the dividing line (the present state border) was believed to be the Continental Divide. Your map will show you where the crazy Continental Divide really runs. North of Virginia City the Continental Divide runs east and west, then circles around and finally, south of Virginia City, it runs east and west again. Then you will go over the top and down into Virginia City, Montana, and are you in for a treat!
The very much alive ghost town, Virginia City, Montana, is frozen in time. It is a remarkably well preserved old west Victorian gold mining town just 20 miles west of Yellowstone National Park (90 miles by road). When the gold ran out, there was still enough left so that homes and businesses were occupied, but there was not enough wealth to remodel the buildings. So it froze, and now represents the whole Victorian era. It is a true and original Old West. It is a gem, held within an incredibly rich area of natural beauty, recreation and history. Adjacent to Virginia City is Nevada City, filled with buildings and artifacts that will impress you. For many years Virginia City, Montana was a Rebel town in Union territory.
 Back in 1865, merchants established the first businesses in Virginia City in wagons, tents, and wickiups (brush shacks) during the summer of 1863. Gold dust was the preferred medium of exchange, which was valued at $16 - $18/ounce.
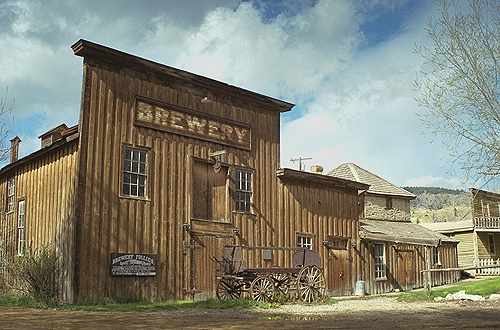 Of course what would a stop in Virginia City be without a stop at the brewery? And yes right next door is the opera house!!
In Old Town, we stopped off at Cousins Candy Shop The Virginia City shop has the original oak shelving and tin ceiling. Jars of the freshest candy are located in an old, covered chuck wagon pictured above. When we opened our shop in Old Town, we replicated the shelving and covered wagon exactly. Not only do we have great candy and a wonderful selection, Cousin's is just a fun place to visit with the entire family Of course the day wouldnt be complete without a stop at the Bale of Hay Saloon , an authentic wild west Saloon complete w/ Montana's best microbrews. Live music to to top off a great day
Abonați-vă la:
Postări (Atom)